Monday, January 19, 2015

Foundations Revealed 5 Senses Competition - dress diary part 2

First I had to find an image. I Google searched ‘5 senses painting’ and after playing with a few, Austrian painter Hans Makart’s “Die Fünf Sinne”, or “The Five Senses” caught my imagination. The oil painting, completed in 1879, consists of five panels depicting the 5 senses. The women are voluptuous and sensual, exactly how I see corsetry. I like the moody, fleshy colours, and I knew that when sewn together, they would loose the obvious visual of naked bodies and would transform into patterns and shapes altered by the minds eye. In addition, the fact that the painting was created in panels lent itself to the panels in corsets.


Hans Makart “The Five Senses” 

The painting is in the public domain as it’s copyright has expired, and I felt that along with editing, I could legitimately use the image.  I have played with using paintings on corsets, making the design in Illustrator, filling each shape with images, and to test the pattern matching, printing them on paper half scale and sewing them up to fit on my half scale mannequin (below). This time though, I decided to try it full scale.


Testing Half scale pattern matching and images. I made these half scale mannequins as they are really hard to buy in Australia and super expensive to import.
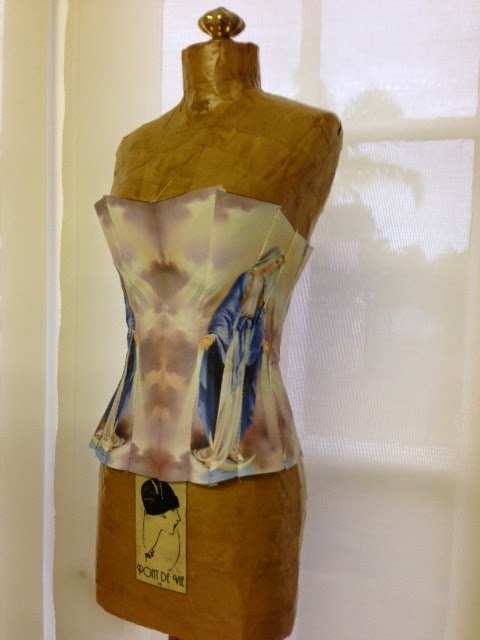

I am facilitated by kitsch religious imagery, and I love the colours.

The shape of the corset was really important. I wanted it to have drama, and reflect the feminine curves of Eve as represented in the painting. With this in mind (and also on the advice of Foundations Revealed suggesting defining a ‘house style’), I have started curving the bottom edges of my corsets, and it worked really well with the images.


Developing my house style: the curved hemline. C cup corset.


This corset is layered with vintage doilies, lace and the embroidery form a disintegrated silk shawl. I also worked back into the layers with embroidery thread. This is also trailing the B cup.

I have found over bust corsets more challenging to fit, so I push myself in the areas that I want to conquer. Even though the corset is covered in naked women, I didn’t want to the garment itself to be seen as ‘rude’ or smutty. The cups fully cover the bust and like flying buttresses, swoop up elongating the body and mirroring the long forms of the figures. The pattern is a variation of my most successful pattern that I worked on for 6 months. I scanned the original pattern into Illustrator, and made the changes digitally. I toiled the shapes in calico until I was happy, then imported the painting and used masks to make each panel. It was quite tricky getting the pattern matching working as there is so much detail and the panel shapes are quite curvy.


Initial design stage.


I printed the pieces onto regular paper, and was faced with the thought that if I was going to try it on, it would need to be stronger. I had a roll of Visofix, so it seemed logical to bond the paper to calico, which was very easy to do (except that the iron removed some of the printing ink, so needed to use a pressing cloth!).

images: printed paper then bonding


Printed on paper.


Bonding to calico and cutting out ready to sew!

Foundations Revealed 5 Senses Competition - dress diary part 1

I have always loved corsets, and ever since I was a teenager I have been fascinated by underwear construction. I have dabbled in corset construction, but my focus was always on comfort, so often I avoided boning altogether. So, it could be argued, not really corset making at all! 


A 'corset' made of flowers for a florist exhibition. I used water balloons on the ends of the stems to keep the flowers alive!

I spent many years making wedding dresses, and while corset structures featured, they were still lightweight, and it was some time before I learnt about using fishbone instead of Rigilene. Even then, I was still focusing on comfort – the damage from too many Rigilene induced injuries clouding my perspective!


An early version of building corset structures into a dress using Rigilene. Unfortunately, Rigilene bends out of shape and doesn't have the necessary support.

Then a few years ago, after I was given a lovely modern corset, my interest in their construction was renewed, and I started looking into proper construction materials. I fell in love with spiral boning; it was aesthetic and comfortable. As a pattern maker, I prefer to make my own patterns, but in order to understand the fit, I bought several patterns hoping to understand the negative ease and shaping. I was never happy with the results, I struggled with the spiral tipping, and as a busy life took over, I let it go again.


This is a corset I machine embroidered, which helped support the structure.

Then last year it hit me again, only this time, with a force, and I decided to conquer my understanding of corsets. Being somewhat obsessive, and also loving paraphernalia, I equipped myself with a playground of materials and tools and was able to really immerse myself in the process and not worry about having to stop to buy supplies.


Building my tool collection!

And so it began: I was happy with my results, learning from each one, and tweaking the patterns and construction. I experimented with different body shapes. I listened to what women wanted from their corsets, and applied it to each progressive pattern. Having good tools on hand meant I achieved a quality of finish that was professional and polished.


I joined Foundations Revealed early last year, and was determined to enter the competition. My preference is for the Victorian silhouette, so the 5 Senses theme was the logical entry for me. In my research, I really liked the modern take on corsets, particularly the use of digitally printed fabrics, and the pattern matching challenges that were then presented. I love working on Illustrator, and have been exploring pattern making on this program as a cheap CAD alternative to more expensive pattern making software. So I knew early on how I would like to approach the design.

Monday, August 4, 2014

The corset construction adventure continues! This week we continued the duct tape experiments and trialed the pattern pieces by making toiles. I have added a new model to the mix, as I wanted to see how the 3D pattern making will go with a large bust (E cup). So now I think I have a good range of shapes to work with to test this method.

For model #3, I had a system going that I think works:
  • Use the cloth duct tape
  • Use a singlet with minimal stretch
  • Tape the singlet at the hem to prevent riding up
  • Start under the bust and work down to the hem
  • Use shorter lengths
  • Shape the bust last


I was only able to buy the black tape, so I made a final layer in coloured packaging tape so I could draw my style lines, but I think this turned out to be a good thing as the whole cast was very stable, easy to cut off, and held its shape when transferred into pattern shapes.
So here are models #2 and #3 as preliminary patterns:


And Model #1 about to cut hers up:


Model #2 came wearing a corset that fit her quite well, so in the interest of the experiment I took a pattern and toiled that too as I want to see if the made to measure shapes
  • Fit better, or
  • Not


We made the toiles using the steel busks that will go in the final design to ensure the front shaping was desirable and also for support (it will be removed when we are happy with the fit). Model #2 about to cut out her toile (I love the groovy corset with a little cardy and matching pearls! Who says corsets aren't for day wear?!)

At this stage we have not boned the corset, only top stitched the seams for support. If the boning is sewn in, it is hard to adjust the seams, but once we are happy, we will use Rigilene for light support. This week we will make removable eyelet tape so the corset can be laced for an accurate shape and ensure the lacing is parallel.

Part of the fun is choosing the out material, so a shopping excursion will be in order to see the exotic fabrics that Sheree from Love in Tokyo is now selling!

Here is a pic of Model #2 trying on one of my prototypes :)

Friday, August 1, 2014

I am always on the lookout for dress form ideas, there are some simple ways to make them, but they don’t always look great. If you are in the design world, then aesthetics are pretty important. I just read a great article on Foundations Revealed on DIY dress forms, link here, and it is good to see that others face the same conundrums.


I have also been wanting to make half scale dress forms more accessible. I bought a beautiful one from America, but the postage was excessive, costing more than the mannequin itself.  Initially I made a mould using plaster bandages, but I quickly realized this wouldn’t work: the bandages added bulk, so it was no longer a true size, and it was really hard to get off (my mannequin is getting quite battered). I then made casts using the paper tape method, which were very successful and look great, but took ages, so are not really viable as a product. Recently I had a go at using the duct tape method to make a pattern, which was ok, but the form mostly looks like a shapely cushion! The experiments will continue…

ps. I just found this post about making a cast, I might try this later