
The Designer Jeans course was great, I
picked up lots of useful tips, and the distressing was great fun. Angela has a
lovely way of presenting, and I raced through all her videos!
I am a big fan of toiling – or making a
muslin as the Americans say- but I was super keen to try out the distressing
techniques, and I had such faith in the Press’n Seal process, I just jumped
straight in. The denim I bought is lovely and soft, but doesn’t distress overly well. In
fact the biggest distress was my studio; it was covered in indigo dust. Note to
self, do that bit outside next time. My original jeans had 2% stretch, but
don’t feel ‘stretchy’, so I thought the 100% cotton demin would be fine.
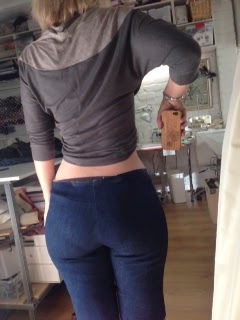
I am
going to post my fitting pictures as information, even though I am not wearing
the best undies, and it is seriously awkward trying to photograph your own bum.
Fitting pants is the hardest thing, and I really appreciate those online folk
who share so much. So this is me giving back… please don't judge...
Here is a snippet of the sewing process. I set up one machine for regular sewing, another with top stitching thread, and of course, the overlocker ( I was lazy and didn't change the thread, but Angela says it is fun to use a contrast colour for overlocking, so who I am I to argue?!)


The process was logical, and from cutting out to trying on, it took about 4 hours. Not bad.


My faithful hound, Jasper, stayed with me, hovering outside the door, impervious to the dust, sandpaper and hammering.

So. They look great, I love the
finish, and they don’t look homemade, but… they won’t do up! Sob! Mistake
number 1: make sure the material you plan to use is the same as the original.
Sewing 101 perhaps, but the shop I went to had a limited range of denim (2
rolls), and I thought it felt as though it had some give. It doesn’t.


What to do? Alter the pattern obviously,
but how much? I thought about the jeans shopping process (almost as bad as shopping for
bras), and how the shop girls tell you to get a tight pair as they ‘relax’. But all
information I could find talked about adding ease. That didn’t sit right with
me, as I wanted my jeans to be fitted, not frumpy. I might be 44, but I don’t
want to look it.
The big property of denim is that it gives,
so it seemed to me you had to have 0 ease, the original pair having negative ease due to the stretch factor. So I measured at intervals from my
waist to hip, then around my thighs, down to my knees, separating the front
measurement form the back to transfer to my pattern. I then recut the pattern
and made a new pair. This time, only to the knee, with the back yoke, but no
pockets. And no distressing.
Joy! They fit like a glove! Super comfy and
my theory of 0 ease paid off. At this point, I added some fitting touches, which the original pair actually lack in terms of fitting me: I increased the back
rise a smidge, as the original sit a bit low. Funny how you notice these things
when you make your own, but overlook when buying ready-to-wear.


with the increased rise - and VPL
But what about the Press’n Seal? I couldn’t
believe that it hadn’t worked! I went to a fabric shop I avoid at all costs (I
get anxious even thinking about the dreadful service) as they had a great range
of denim. So I sucked it up and bought some more, one of which is stretchy.
Another toile, same as the second one, with very basic construction. And what
do you know?! They fit perfectly! Yay! Press’n Seal is the best!


Stay tuned!
No comments:
Post a Comment